Want to get started in Ham Radio Mesh Networking but don’t know where to start? This is the place for you! This article will walk you through what you need and how to set up your first couple of mesh nodes step by step. We’re going to be using the firmware developed by the AREDN team (Amateur Radio Emergency Data Network).
Step 1: Choose Your Band
If there are existing nodes in your area, the choice is easy. Check the AREDN website regional forums and the “live” map of mesh nodes as well as the other hams in your area. Likewise if you already happen own some compatible hardware, start with that.
Assuming you are starting from scratch, I’m going to keep it simple for you: Use the 5.8 GHz band. This band offers 7 channels that are exclusive to amateur use.
You may be tempted to start with 2.4 GHz but that really has only one usable channel that’s not shared with the general public part 15 channels. See our article on mesh networking bands for more detailed info.
Step 2: Choose Your Device
For beginners, there’s only one choice: The Ubiquity Nanostation M series. Assuming you are going with the the 5.8 GHz band, use the Nanostation M5.

Coupla gothcha’s – You want a “Nanostation M5”. You do not want a “Nanostation 5” (without the M) or a “Nanostation Loco M5″ model (a single chain device).
New devices come with the POE (Power Over Ethernet) power supply in the box. This is often not included with used devices on ebay, for instance. See our buying guide for more tips.
Step 3: Install AREDN Firmware
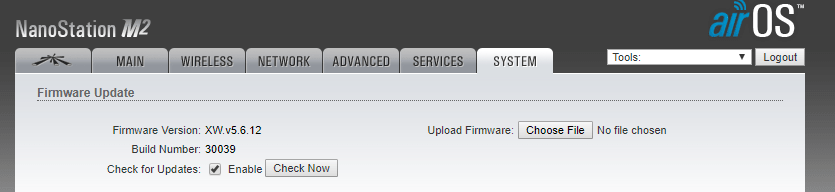
Ok, this is the trickiest part. The device comes from the factory with the standard Ubiquity AirOS firmware. You need to overwrite this with AREDN firmware, but first you’ll want to log in to the setup page and check the “System” tab to determine the hardware version of your device. It will be either an “XM” or “XW”:
You’ll need to connect the Nanostation through its POE power supply to Ethernet port of a PC. If your device was purchased used, you’ll want to perform a factory reset of the standard firmware.
Originally, it was possible to use the AirOS firmware upgrade feature to painlessly install AREDN. However, the recent versions of AirOS don’t allow you to upload anything except a current, Ubiquity-signed image.
Therefore, on a device that still has the standard firmware, you’ll need to use the TFTP procedure to upgrade the “factory” version of the correct AREDN image for your device found on the download page. (The “sysupgrade” image is for upgrading nodes that already have an earlier version of AREDN installed.)
As of this writing, 3.18.9.0 is the latest stable version of AREDN firmware. The best bet here is to follow these instructions on the AREDN website, but I’m working on posting my own tutorial and screen-recording real soon now.
Step 4: Configure the Node
A just-flashed AREDN node requires a few mandatory setup items. You’ll need to:
Enter a new password, this protects the setup page.
Name the node. Start with your callsign, as this is broadcast every ten minutes to satisfy FCC rules. I tend to use this format: callsign-device-location. For instance: “KD2EVR-NSM5-QTH” to represent a Nanostation M2 installed at my house. Each node needs a unique name.
Set a non-zero distance setting. Set this to the distance to the furthest node you expect to see over RF. If you are just testing close-in, use the lowest valid setting i.e. 1km.
Set the operating channel and bandwidth. Nodes must be on the same settings to communicate over RF. Beginners on 5.8 MHz could start with channel 180 and say 10MHz bandwidth. If you chose 2.4 GHz instead, you only have one choice to stay clear of unlicensed interference while staying in-band: channel -2 (yes, minus two) and no more than 10MHz bandwidth.
Don’t mess with SSID setting unless you’re trying to link with an existing network that doesn’t use the default. Learn more in our article about the SSID.
Step 5: Reboot and wait for it to link up
Now your node will find any nearby nodes with the same channel, bandwidth and SSID settings and form a network. Over the course of a few minutes, the Mesh Status page will populate with this information. Note that you’ll have to manually refresh the page to see any updates. Congratulations, you’re on the mesh!
